

You Don’t Want Your First Migration Attempt to Be on Production
Too many teams run their first serious migration test directly in the live HubSpot portal:
- “We’ll just import a small batch and see what happens.”
- “If it looks bad, we’ll delete and try again.”
That’s how you end up with:
- Stray test records and half‑configured objects cluttering the portal.
- Workflows firing on real contacts.
- Integrations overwriting live data.
HubSpot sandboxes exist for exactly this reason.
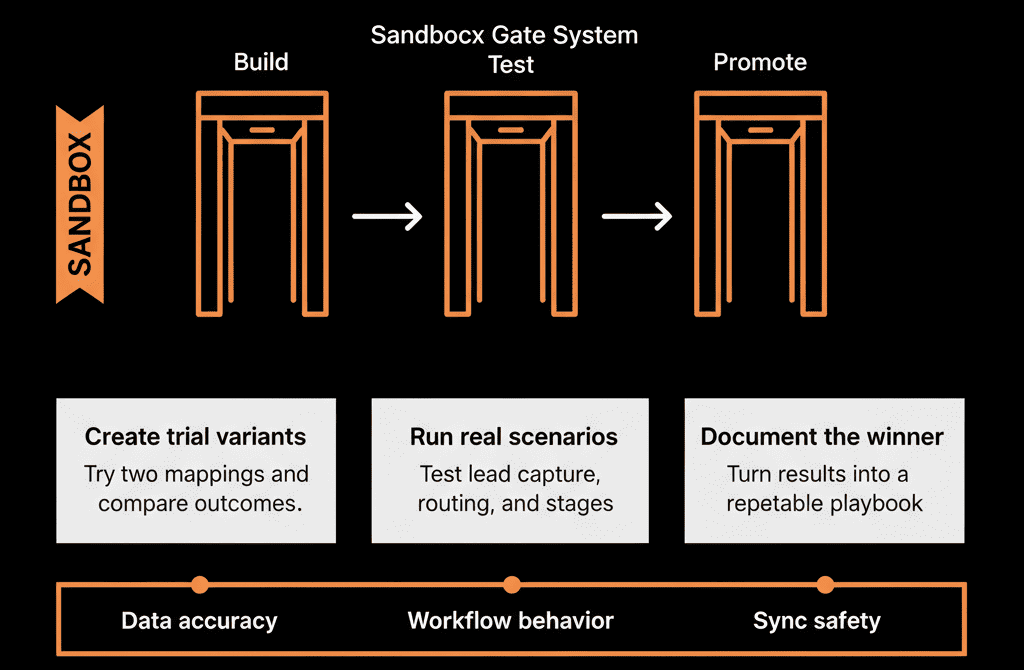
Used properly, they let you:
- Trial different migration approaches.
- Validate mappings and workflows.
- Get user feedback—without putting production at risk.
In this article, we’ll walk through how to use HubSpot sandboxes to de‑risk your migration.
Step 1 – Understand What a HubSpot Sandbox Actually Is
A HubSpot sandbox is a separate environment tied to your main account, designed for testing.
Key points:
- It’s logically separate from your production portal.
- It can copy much of your configuration:
- Objects and properties.
- Pipelines and stages.
- Workflows, lists, and templates (depending on your tier and setup).
- It does not automatically mirror all live data.
- You can selectively bring in sample records as test data.
Think of it as a safe playground where you can:
- Try imports.
- Adjust mappings.
- Experiment with automations and integrations.
Without risking your actual customers and pipeline.
Step 2 – Why Sandboxes Are Ideal for Migration Testing
For a migration, sandboxes help you:
Test your data model and mappings
- See how legacy objects and fields fit into your HubSpot schema.
- Adjust and iterate before finalizing.
Trial import and transformation logic
Validate that:
- Data types are correct.
- Associations (Contacts ↔ Companies ↔ Deals) behave as expected.
Test workflows and automations
Confirm that:
- Lead routing works.
- Lifecycle and stage changes behave correctly.
- Notifications and tasks aren’t overwhelming.
Test integrations safely
Ensure external tools don’t overwrite or pollute data.
Confirm events and syncs are configured correctly.
All of this happens away from your live users and customers.
Step 3 – Set Up a Sandbox That Mirrors Your Target HubSpot Design
Don’t just clone your current messy production. Use the sandbox to reflect your target data model.
Steps:
Clone or configure base settings
Use HubSpot’s sandbox creation tools to:
- Copy relevant configuration from production (where it’s already correct).
- Or, configure:
- Objects, properties, pipelines, and teams according to your migration blueprint.
Recreate key workflows (in test mode)
Turn on only the workflows you plan to use post‑migration:
- Lead routing.
- Lifecycle logic.
- Essential notifications.
Leave advanced or non‑essential automations off at first.
Set up permission roles and teams
Mirror how you intend to structure access in production.
This lets you test how different user types will experience the new setup.
Your sandbox should look and feel like the HubSpot you want, not the HubSpot you’re escaping from.
Step 4 – Trial Data Loads with Representative Samples
Now, use the sandbox to test migration approaches with real sample data.
For each legacy system (old CRM, spreadsheets, ticketing, etc.):
Export a representative sample
- 500–2,000 contacts.
- 100–500 companies.
- 50–200 deals.
- 20–100 tickets (if relevant).
Include:
- Different segments, regions, lifecycle stages, and products.
Apply your planned transformations
- Clean and normalize values (e.g., country, industry, titles).
- Map old fields to new HubSpot properties based on your data model.
Import into the sandbox
Use HubSpot import tools or migration utilities.
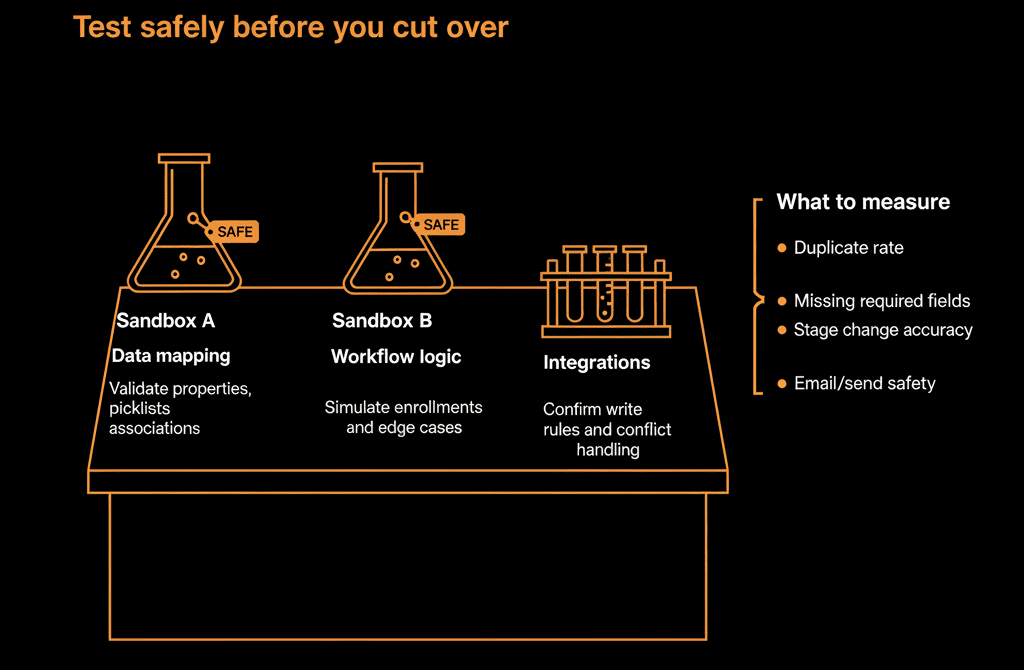
Validate results
Check:
- Record counts match expectations.
- Key properties are populated correctly.
- Associations are correct.
Spot‑check high‑value accounts and complex records side‑by‑side with legacy data.
Refine mappings and transformation rules until you’re comfortable they work reliably.
Step 5 – Test Workflows and Automations Against the Sample Data
With test data in the sandbox, you can simulate real‑world behavior.
Test:
Lead routing and assignment
Create or import new “lead” records into the sandbox.
Confirm:
- Owners are set correctly.
- Tasks/notifications go to the right users.
Lifecycle and stage logic
Move sample records through expected paths.
Confirm:
- Lifecycle stages update correctly based on deal creation and movement.
- No unintended back‑and‑forth transitions.
Notifications and sequences (with caution)
If testing email sequences:
- Use internal/test email addresses only.
- Ensure no real customers are enrolled in sandbox sequences.
CS workflows (if Service Hub)
Create test tickets.
Check:
- Routing, SLAs, and notifications.
Make adjustments in sandbox workflows until behavior is predictable and aligned with your process.
Step 6 – Trial Integrations Without Polluting Production
Sandbox is the safest place to connect and test integrations.
Approach:
Connect integrations configured to sandbox
Many tools support separate sandbox/dev accounts or test modes.
Where they don’t, configure them to point to the sandbox instance while you test.
Limit integration scope
Start with read‑only or one‑way sync into sandbox where possible.
Narrow which records and fields are involved.
Validate integration behavior
Confirm that external tools:
- Create or update records as expected.
- Don’t introduce bad or conflicting data.
- Respect your source‑of‑truth rules for key properties (owner, lifecycle, etc.).
Decide production patterns
Only after sandbox integration behaves correctly do you:
- Mirror those settings in production.
- Widen scope if needed.
Sandboxes help you avoid the “we turned on the app and it overwrote half our owners” scenario.
Step 7 – Involve Real Users in Sandbox Testing
Don’t limit sandbox usage to admins.
A small group of end‑users can surface issues you won’t see.
Steps:
Invite pilot users from each team into the sandbox
2–4 people from Sales, Marketing, CS.
Give them realistic tasks
- “Work this list of leads for a day (in sandbox) and tell us what feels off.”
- “Move these deals through a typical sales cycle.”
- “Handle these tickets using Service Hub.”
Collect structured feedback
Ask:
- What’s confusing?
- What’s missing from record views?
- Where are you clicking more than you should have to?
Refine configuration
Adjust fields, views, workflows based on patterns in feedback.
This ensures that when you go live, the system has already been “battle‑tested” by real users.
Step 8 – Treat Sandbox Learnings as Inputs to a Safer Production Plan
Everything you learn in the sandbox should feed your production migration playbook.
Summarize:
Data mapping lessons
- Which transformations were required?
- Which fields caused issues or were unnecessary?
Workflow and automation lessons
- Which rules worked as intended?
- Which created noise or conflicts?
Integration lessons
- Which apps were easy vs fragile?
- What field‑level access and directions are safe?
UX and adoption lessons
- Which views or layouts were confusing?
- What training and documentation will users need most?
Use these to:
- Lock in your final production data model.
- Finalize migration runbooks.
- Prioritize key enablement topics.
Step 9 – Know the Limits of Sandboxes (and Plan Around Them)
Sandboxes are powerful, but not perfect replicas.
Common limitations to be aware of:
- Not all production data is copied over automatically.
- You’ll manually choose or sample data.
- Some integrations/tools may not support sandbox environments natively.
- You may have to simulate parts of them.
- Users must be provisioned separately in sandbox.
- Permissions may need to be manually set up.
Plan accordingly:
- Don’t aim to replicate your entire production state.
- Focus testing on representative scenarios and critical flows.
Pulling It Together: Practice the Migration Before You Perform It
Using HubSpot sandboxes during migration planning lets you:
- Test data loads, automations, and integrations without risking production.
- Involve users early to refine configuration.
- Turn unknowns into knowns before you commit.
The playbook:
- Configure a sandbox to match your target HubSpot design.
- Import representative samples from legacy systems.
- Validate data mappings and associations.
- Test critical workflows and routing.
- Trial integrations and refine field‑level rules.
- Involve pilot users and incorporate their feedback.
- Use sandbox learnings to finalize your production migration plan.
Do this, and your first real migration run in production will feel like your third or fourth—because it is, just practiced elsewhere.
Want Help Designing and Testing Your HubSpot Migration in Sandboxes?
If you want to de‑risk your HubSpot migration by trialing it in sandboxes—but aren’t sure how to structure the tests—this is exactly where we can help.
Our HubSpot Portal Health Check and Migration & ROI Plan are designed to:
- Define your target HubSpot data model and configuration.
- Plan sandbox‑based migration tests and validation steps.
- Translate successful sandbox trials into a clean, confident production cutover.