

A Service Hub Migration Is More Than “Moving Tickets”
When teams move support into HubSpot Service Hub, they often treat it like a simple transfer:
- “We’ll export cases from Zendesk/Freshdesk/Help Scout.”
- “We’ll import them as tickets into Service Hub.”
- “Agents will figure it out once everything’s there.”
The reality is more sensitive:
- Support history holds critical customer context.
- Active tickets affect SLAs and customer satisfaction right now.
- CS and Support workflows may be tightly tied to the old tool.
If you rush the migration, you risk:
- Losing key conversation history.
- Breaking SLAs mid‑migration.
- Confusing agents with half‑baked pipelines and views.
In this article, we’ll walk through how to migrate ticketing and support histories into HubSpot Service Hub in a controlled way—so agents and customers both experience the change as an upgrade.
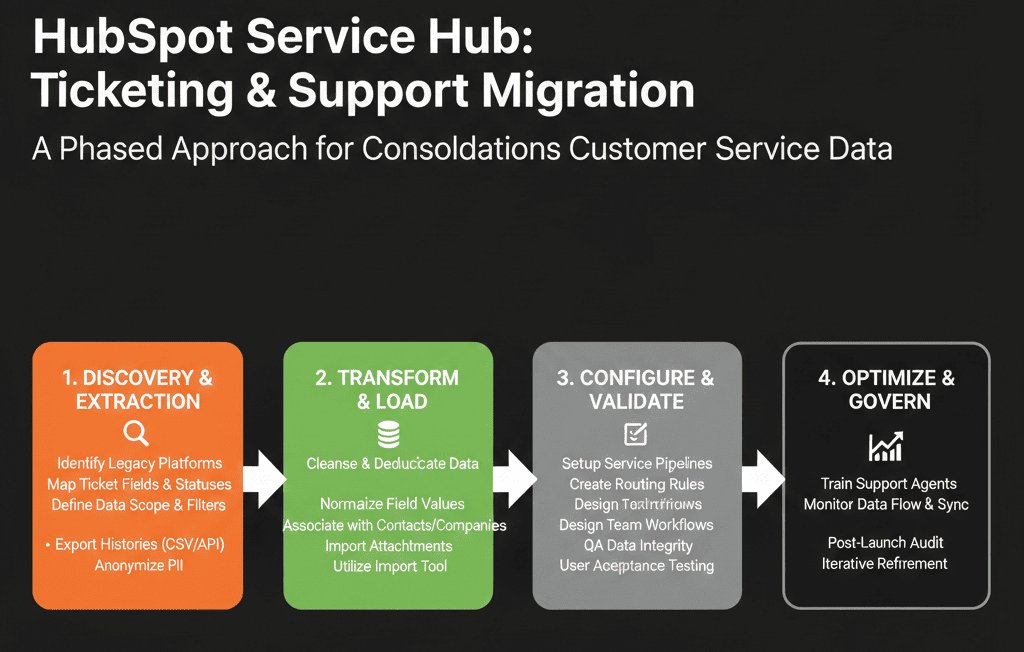
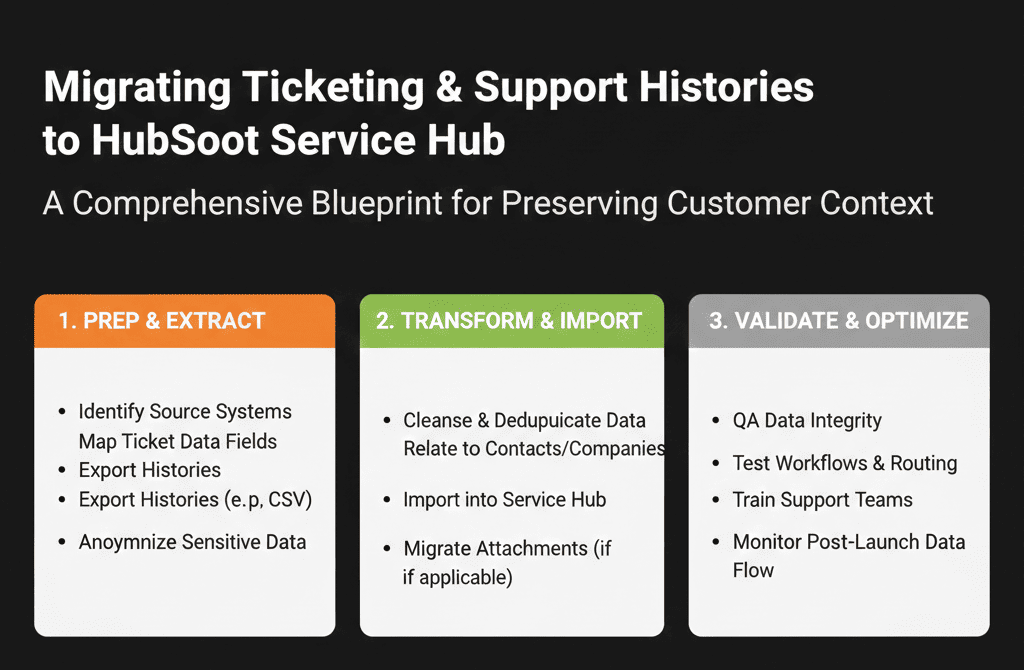
Step 1 – Audit Your Current Support Setup Before Planning the Move
Start with a clear picture of how support actually works today, not just what the tool says.
For your current system(s) (e.g., Zendesk, Freshdesk, Intercom, Help Scout, Jira, etc.):
- Who uses it?
- Support, CS, Sales, internal IT, others?
- What do you track?
- Tickets/cases.
- Conversations (email/chat).
- SLAs and priorities.
- Knowledge base content.
- How are tickets structured?
- Statuses (Open, Pending, On Hold, Solved, Closed…).
- Priorities (Low/Med/High/Urgent).
- Types (Bug, Feature Request, How‑to, Billing, etc.).
- What reporting is critical?
- Response time, resolution time, CSAT, NPS, backlog, etc.
Also note:
- Which other systems your ticketing tool connects to today (product, CRM, billing).
This audit becomes the foundation for your Service Hub design and migration plan.
Step 2 – Decide What History You Actually Need to Migrate
You don’t have to bring everything.
You do need to bring enough that agents can serve customers and reporting still makes sense.
Together with Support/CS leadership, decide:
- Time horizon for historical tickets
- Example: last 12–24 months of tickets.
- Older tickets might be archived in your old tool or in cold storage.
- Ticket types to migrate
- Customer‑facing support.
- Perhaps not internal IT or engineering tickets (unless they belong in Service Hub).
- Level of detail
- Full conversation history vs summary fields and final status.
General guidance:
Migrate:
- Recent tickets and open/active ones.
- High‑value or strategic accounts’ history.
Archive (vs. import):
- Very old tickets from churned/low‑value segments.
- Internal/engineering workflows that belong in other tools (e.g., Jira).
Less noise = more usable Service Hub from day one.
Step 3 – Design Your Service Hub Ticket Pipelines and Properties
Before you import anything, design how Support should work in HubSpot, not just replicate your old setup.
Pipelines and stages
Decide whether you need:
- One unified support pipeline.
- Multiple pipelines (e.g., General Support, Onboarding, Escalations).
Define clear stages with entry/exit rules, e.g.:
New → In Progress → Waiting on Customer → Waiting on Third Party → Resolved → Closed.
Ticket fields/properties
Standardize properties for:
- Priority (Low/Med/High/Urgent).
- Type (Bug, Question, Billing, etc.).
- Channel (Email, Chat, Phone, Portal).
- Product/Module (if relevant).
Decide which are required when:
- On creation.
- Before moving to Resolved/Closed.
Ownership and teams
- Align ticket owners with support teams or pods.
- Use HubSpot teams for regional or specialist groups (e.g., EMEA Support, Tier 2, Billing).
This Service Hub blueprint is your target model for mapping tickets from the old system.
Step 4 – Map Ticket Fields, Statuses, and Relationships to HubSpot
Next, create a detailed mapping document from your old tool to Service Hub.
Map:
Ticket fields → HubSpot ticket properties
Subject, description, status, priority, type, tags, channel, created/closed dates.
Statuses → Stages in your new pipeline
- “Open” / “New” → New.
- “Pending” / “Awaiting Reply” → Waiting on Customer.
- “On Hold” → Escalated or Waiting on Third Party.
- “Resolved” / “Closed” → Resolved or Closed (depending on your approach).
Map relationships:
Ticket → Contact
Primary requester.
Ticket → Company
Account the ticket relates to.
Ticket → Deal (optional)
Where tickets are tied to specific deals (implementation, onboarding, etc.).
Decide how to handle:
Tags/labels
Which become formal properties; which are dropped; which are merged.
Attachments and inline images
Whether you’ll migrate them or keep them in the old tool as archive.
This mapping doc is what your migration partner or internal team will use to configure imports and transformations.
Step 5 – Run a Test Migration of Tickets into Service Hub
Never jump straight to a full import.
Instead:
Export a small but representative sample of tickets:
200–500 tickets from different time periods, priorities, types, and customers.
Import them into a test or non‑production environment (or at minimum, a “test” pipeline in your live portal).
Then validate:
Ticket fields
Are status, priority, type, and dates correct?
Associations
Are tickets correctly linked to the right contacts and companies?
Views and experience
Can agents see the full context they need on the ticket record?
Spot‑check multiple tickets per segment (by region, product, account size) with Support leaders.
Fix any mapping issues now, not after 100k tickets are loaded.
Step 6 – Plan a Clean Cutover for Active Tickets
The biggest risk in a Service Hub migration is mishandling active tickets.
You need a clear cutover plan for:
- When the old system stops being the source of truth.
- When agents start working from Service Hub.
Typical pattern:
- Announce a cutover window (e.g., a weekend or low‑volume period).
- Put the old system into a “frozen” state for new tickets:
- Forward key support addresses to HubSpot inboxes.
- Pause old web forms or redirect them to HubSpot forms.
- Final export and import:
- Migrate all open/active tickets into Service Hub.
- Ensure owners and statuses reflect their current reality.
- On day one in HubSpot:
- All new tickets flow directly into Service Hub.
- All active tickets from the old system are visible and workable in Service Hub.
- Agents know they no longer touch the old tool for ticket handling.
Step 7 – Decide How Much Conversation History to Bring Across
Full conversation histories are often large and messy to migrate. You have options.
Common approaches:
Full history in HubSpot (where possible)
Emails and notes migrated as timeline activities.
Pros:
- Agents see everything in one place.
Cons:
- Larger data volumes.
- More effort to transform and import.
Partial history + link to archive
Only recent interactions or final resolution notes in HubSpot.
A “Legacy ticket link” property points to the ticket in the old system (read‑only archive).
Pros:
- Lighter import, less complexity.
Cons:
- Agents may occasionally have to click out to see deep history.
Summary fields only for older tickets
Older tickets imported as “summary only”: key fields + final comments.
Choose based on:
- Volume of history.
- How often deep history is actually used.
- Retention and compliance requirements.
Whatever you decide, be consistent and explain it clearly to agents.
Step 8 – Set Up Views, Inboxes, and SLAs for Agents
Once data is in, Service Hub needs to be usable for day‑to‑day work.
Configure:
Shared inboxes
E.g., support@, success@, billing@.
Route into appropriate pipelines/teams.
Agent views and queues
“My open tickets”.
“Unassigned tickets”.
“High priority – overdue”.
SLAs and automation
Time‑to‑first‑response and time‑to‑resolve SLAs by ticket type/priority.
Alerts and escalations when SLAs are breached.
These operational pieces are just as important as the historical migration. They determine whether teams can adopt Service Hub without losing productivity.
Step 9 – Rebuild Key Support Reports and Metrics in HubSpot
Support leaders need continuity in metrics.
From your old system, list the must‑have reports:
- Ticket volume by channel and type.
- First response time and resolution time.
- CSAT/NPS (if tracked).
- Backlog and aging by owner/team.
In Service Hub, rebuild these using:
- Ticket reports (by create date, close date, status, owner, type).
- SLA reports (where SLAs are configured).
- Feedback tools (if you move CSAT/NPS into HubSpot).
Compare old vs new for a few recent periods to validate:
- Are we measuring the same things the same way?
- Do the numbers line up reasonably (allowing for differences in definition)?
This builds trust that the move hasn’t “broken” Support’s ability to prove value and hit targets.
Step 10 – Train Agents and CS Teams on Service Hub (Not Just “We Migrated”)
Finally, treat this as a new tool rollout for Support, not just a data exercise.
Provide:
- Role‑based training sessions for agents, leads, and managers.
- Simple playbooks or quick‑start docs:
- “How to work tickets in Service Hub.”
- “Where to find old tickets.”
- “How to log and escalate issues.”
- Plan a hypercare period (2–4 weeks) where:
- Issues with ticket data or workflows are quickly fixed.
- Feedback on views, fields, and automations is collected and prioritized.
The goal is for agents to say, “This is better than what we had,” not “We lost half our history and everything’s slower.”
Pulling It Together: Protect Context While You Upgrade the Tool
Migrating ticketing and support histories into HubSpot Service Hub is about more than checking an “import complete” box.
You’re trying to:
- Preserve customer context.
- Maintain or improve SLAs.
- Give Support and CS a single view of the customer alongside Sales and Marketing.
That requires:
- Clear scope of what history to bring.
- A thoughtful Service Hub data model and pipeline design.
- Careful mapping and test migrations.
- A clean cutover for active work.
- Strong training and reporting reconstruction.
Done well, Service Hub becomes the place where the whole revenue team can see and act on the full customer journey.
Want Help Migrating Support into Service Hub Without Losing History?
If you’re moving from Zendesk, Freshdesk, Intercom, or another ticketing tool into HubSpot Service Hub—and you’re worried about breaking context or SLAs—this is exactly where we can help.
Our HubSpot Portal Health Check and Migration & ROI Plan are designed to:
- Audit your current support setup and critical histories.
- Design a Service Hub data model, pipelines, and SLAs that match how you serve customers.
- Plan and execute a migration that keeps agents effective and customers supported throughout the change.