

SLAs Don’t Fail Because They’re Written Badly. They Fail Because They’re Not in the System.
Many Marketing–Sales SLAs live in:
- Slides from a quarterly offsite.
- A doc no one opens.
- Memory (“I think we agreed on 24 hours?”).
Without operationalization, you get:
- Marketing frustrated that MQLs are ignored.
- Sales frustrated by lead quality.
- Leadership frustrated by finger‑pointing.
HubSpot can’t solve alignment by itself—but it can:
- Enforce response times.
- Track acceptance and feedback.
- Make SLA performance visible.
In this article, we’ll show how to operationalize SLAs between Marketing and Sales inside HubSpot.
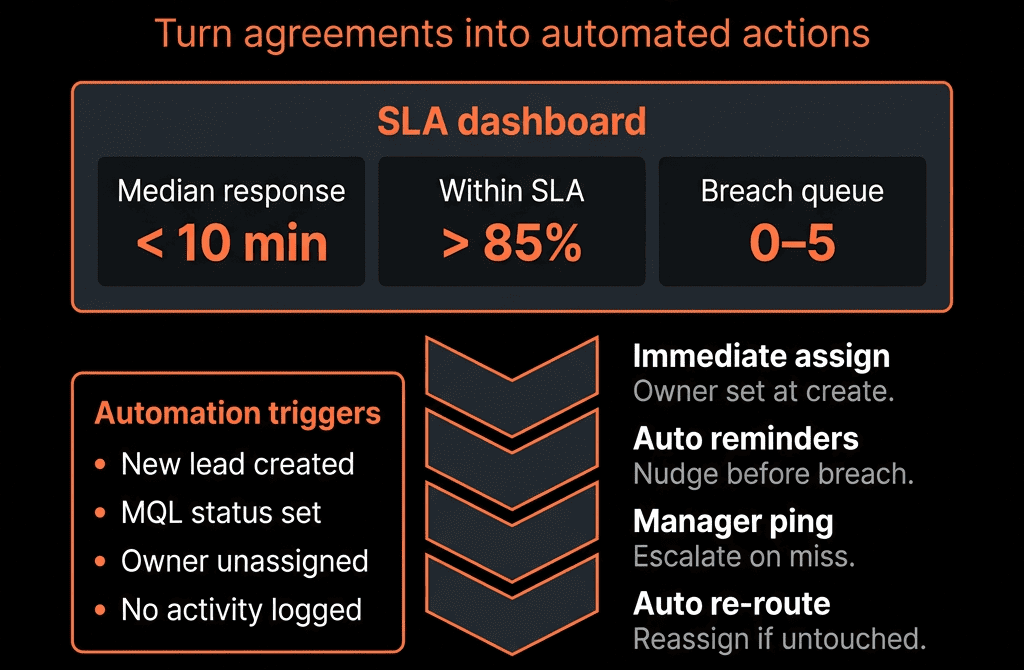
Step 1 – Define SLAs in Concrete, Measurable Terms
Start with a simple SLA contract that both teams agree to.
Typical SLA components:
Speed‑to‑lead
Example:
- High‑intent leads (demo, “contact sales”): first touch within 2 business hours.
- Other MQLs: first touch within 24 hours.
MQL handling
Example:
- Sales must accept or reject an MQL within 2 business days.
- Rejections must include a reason code.
Feedback loop
Example:
- Sales agrees to classify MQL outcomes (e.g., “good fit, bad timing,” “not ICP”) to inform Marketing.
Marketing commitments
Example:
- Marketing will only mark as MQL leads that meet agreed fit + intent criteria.
- Target volume and quality thresholds will be reviewed monthly.
Write these down in plain language before translating into HubSpot.
Step 2 – Create the HubSpot Properties You Need to Track SLA States
You need properties that reflect SLA‑relevant states and timestamps.
Useful custom properties:
On Contact (and/or associated Deal):
SLA type
Values: High‑intent / Standard / None.
MQL date
Date when lifecycle moved to MQL.
First sales touch date
Date of first logged sales activity (call, email, meeting).
SLA met?
Yes/No.
MQL status
Values: New / Accepted / Rejected / Worked.
MQL rejection reason
Dropdown (e.g., Not ICP, No budget, Duplicate, Student, Vendor, etc.).
These fields allow workflows and reports to see:
- When the MQL “clock” started.
- When Sales acted.
- What Sales decided.
Step 3 – Wire Lifecycle and MQL Creation into These Properties
Ensure your lifecycle/MQL logic sets the right properties.
Workflows:
When Contact becomes MQL
Trigger:
- lifecycle_stage changes to MQL.
Actions:
- Set MQL date to now (only if blank).
- Set MQL status to “New.”
- Define SLA type based on form, source, or other criteria.
When Sales creates a qualifying Deal
Optionally, treat Deal creation as implicit “acceptance”:
- If Contact was MQL and a Deal is created, set MQL status to “Accepted” if not already.
This ensures your SLA logic starts when the lead becomes Marketing’s responsibility to Sales.
Step 4 – Track First Sales Touch Automatically
You want HubSpot to detect when Sales has actually engaged.
Approaches:
Use activity tracking:
Create a workflow that:
- Enrolls MQLs with no First sales touch date.
- Watches for first logged Sales activity (e.g., call, 1:1 email, booked meeting).
- When detected, sets First sales touch date to the date of that activity.
Alternatively, Sales can set a simple property (less ideal):
E.g., First touch logged = Yes—but automation is better.
This is critical for measuring time‑to‑first‑touch, the core speed‑to‑lead SLA.
Step 5 – Use Workflows to Enforce Speed‑to‑Lead SLAs
Now, build workflows based on MQL date, First sales touch date, and SLA type.
Example: High‑intent SLA
Enrollment:
Contacts where:
- lifecycle_stage = MQL.
- SLA type = High‑intent.
- First sales touch date is unknown.
Actions:
- Wait for 2 business hours.
- If First sales touch date is still unknown: create a reminder task for the owner.
- Wait additional time (e.g., 2 more hours).
- If still no touch: set SLA met? = No, notify owner + manager via internal email/Slack, optionally reassign to a backup queue.
For standard MQLs, adjust delays according to agreed SLAs.
This workflow translates your speed‑to‑lead promise into system behavior.
Step 6 – Operationalize MQL Acceptance and Rejection
An SLA has two sides: not just speed, but acknowledgment and feedback.
MQL acceptance
Implementation options:
Light‑touch method:
Treat certain actions (e.g., new Deal creation) as implicit acceptance.
Workflow sets MQL status = Accepted when a Deal is associated and Contact is MQL/SQL.
Explicit method:
Provide reps with a MQL status field they must set (New/Accepted/Rejected).
Require setting this field as part of working their MQL queue.
MQL rejection
Define valid MQL rejection reason values.
Enforce via workflow and validation:
- If rep sets MQL status = Rejected and MQL rejection reason is empty → create task or block status change.
This creates an auditable feedback loop:
Marketing can see:
- % of MQLs Accepted vs Rejected.
- Top rejection reasons by segment or channel.
RevOps can refine MQL criteria based on real data.
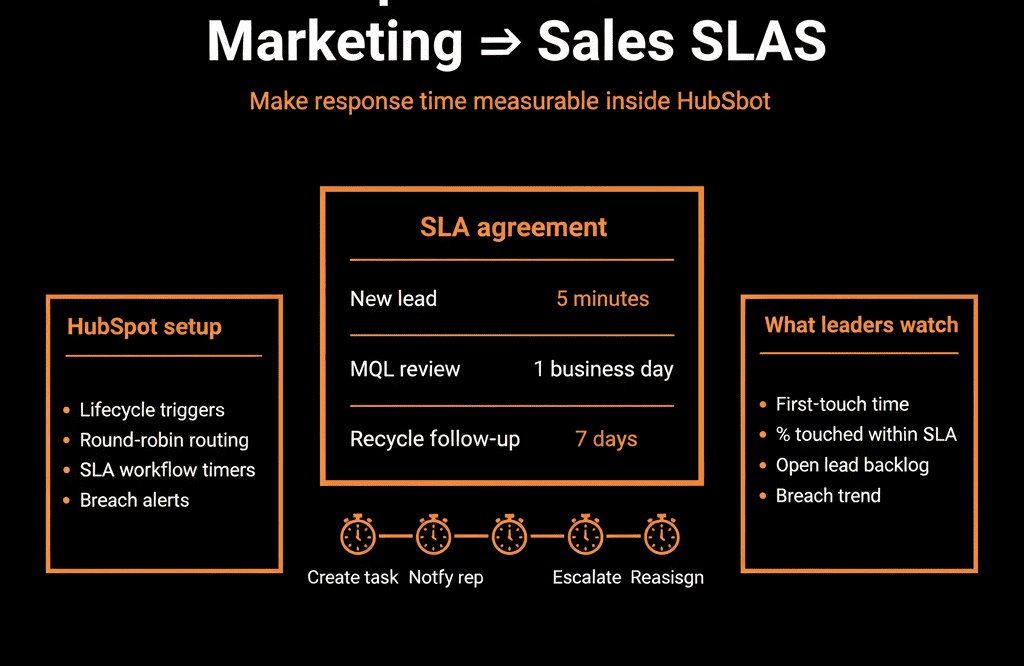
Step 7 – Build Marketing–Sales SLA Dashboards
You need shared visibility into SLA performance.
Key reports/dashboards:
Speed‑to‑lead performance
- Average and median time‑to‑first‑touch for high‑intent MQLs and standard MQLs.
- % of MQLs met vs breached SLA.
MQL handling
- MQL volume by week/month, by source/channel.
- MQL status breakdown: New / Accepted / Rejected.
- Acceptance rates by segment, rep, and channel.
Rejection analysis
- Top MQL rejection reason counts by channel/campaign.
- High rejection rates by source (indicating targeting or scoring issues).
This dashboard becomes the centerpiece of your monthly/quarterly Marketing–Sales alignment conversations.
Step 8 – Embed SLA Expectations into Team Workflows
Make SLAs part of how teams work, not just something Ops watches.
For Sales:
Provide:
- “My new MQLs to work today” views.
- Task queues specifically for MQL follow‑up.
Train:
- What constitutes acceptance vs rejection.
- How to update MQL status and reasons.
For Marketing:
Monitor:
- SLA performance by campaign.
- Rejection reasons.
Act:
- Refine scoring and targeting based on Sales feedback.
- Stop or adjust campaigns with poor acceptance.
RevOps:
Own:
- Workflows and properties that enforce SLAs.
- Dashboard maintenance and SLA definitions.
This turns the SLA from a high‑level agreement into a daily operating reality.
Step 9 – Review and Adjust SLAs Regularly
As volume, team size, and GTM strategy change, your SLAs should too.
Quarterly, ask:
- Are SLAs realistic given lead volume and rep capacity?
- Are certain segments or channels consistently breaching SLAs? Why?
- Are rejection reasons indicating mis‑aligned MQL criteria?
- Are we routing leads to the right people and territories?
Then adjust:
- SLAs by lead type if needed.
- Routing rules.
- MQL definitions and scoring.
Your HubSpot implementation makes these changes measurable and testable.
Pulling It Together: SLAs as a System, Not a Slide
Operationalizing Marketing–Sales SLAs in HubSpot means:
- Translating agreements into properties (status, timestamps, reasons).
- Using workflows to enforce speed, acknowledgment, and feedback.
- Building dashboards that make performance visible and actionable.
- Embedding expectations into day‑to‑day views, tasks, and training.
Do this, and SLAs stop being a theoretical alignment tool—and become part of how you actually run your funnel.
Want Help Turning Your Marketing–Sales SLAs into HubSpot Reality?
If you have SLAs on paper but no way to prove or enforce them in HubSpot, this is exactly where we can help.
Our HubSpot Portal Health Check and Migration & ROI Plan are designed to:
- Audit your current lifecycle, MQL, and routing setup.
- Design SLA properties, workflows, and dashboards tailored to your GTM.
- Implement a practical framework so Marketing and Sales can see, and improve, SLA performance together.